Most frequent ReactJs Questions and Answers :

Hey, I’m Riya Jain! 👋
Frontend developer, mentor, and your go-to guide for navigating the tech world! With 6.5 years of experience, I’ve been through the highs and lows of breaking into and growing in frontend development—and now, I’m here to help you do the same.
🎯 My Mission
I know how overwhelming it can be to navigate the tech industry—whether you're preparing for interviews, trying to upskill, or figuring out the best way to land a job through referrals and applications. I’ve been there. That’s why I’m on a mission to share practical insights, strategies, and resources to help you break into frontend development and grow in your career.
💡 What You’ll Find Here
🔥 How to Ace Frontend Interviews – Tips, common pitfalls, and must-know concepts 🚀 How to Continuously Learn & Stay Ahead – Keeping up with modern frontend tech 🎯 Navigating Referrals & Job Applications – How to stand out and get noticed
🍵 Let’s Connect!
I love sharing knowledge, but even more, I love learning from this amazing tech community. If you ever have questions or just want to chat, feel free to reach out on LinkedIn! https://www.linkedin.com/in/riya-jain-6691b8127/
Oh, and if you enjoy my content and want to support my work, maybe consider buying me a cup of coffee? 🍵😉
Stay curious, keep learning, and let’s grow together!
– Riya, your frontend guide & coffee-loving nerd. 🚀
Hi All, In this article most frequently asked reactjs interview questions and answers are there.
🔹How Virtual DOM works. Explain in detail.
Virtual DOM is an in-memory representation of real DOM. It is a lightweight JavaScript object which is a copy of Real DOM.
- Updating virtual DOM in ReactJS is faster because ReactJS uses
- Efficient diff algorithm
- Batched update operations
- Efficient update of subtree only
- Uses observable instead of dirty checking to detect the change
ReactJS uses observable’s to find the modified components. Whenever setState() method is called on any component, ReactJS makes that component dirty and re-renders it. Whenever setState() method is called, ReactJS creates the whole Virtual DOM from scratch. Creating a whole tree is very fast so it does not affect the performance. At any given time, ReactJS maintains two virtual DOM, one with the updated state Virtual DOM and other with the previous state Virtual DOM.
ReactJS using diff algorithm compares both the Virtual DOM to find the minimum number of steps to update the Real DOM.
Finding the minimum number of modifications between two trees have complexity in the order of O(n^3). But react uses a heuristic approach with some assumptions which makes the problems to have complexity in the order of O(n).
ReactJS uses the following steps to find the difference in both the Virtual DOM’s
1. Re-render all the children if parent state has changed. If the state of a component has changed, then ReactJS re-renders all the child components even if child components are not modified. To prevent the unwanted re-render of the child components we can use shouldComponentUpdate() component life cycle method. This will further help in boosting performance.
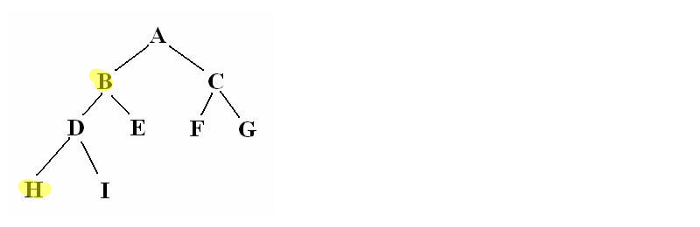
2.Breadth First Search. ReactJS traverse the tree using BFS. Consider the below tree. States of element B and H have changed. So when using BFS ReactJS reached element B it will by default re-render the element H. This is the reason to use BFS for tree traversal.
3. Reconciliation. It is the process to determine which parts of the Real DOM need to be updated. It follows the below steps:
a.Two elements of different types will produce different trees. b.The developer can hint at which child elements may be stable across different renders with a key prop.
https://reactjs.org/docs/reconciliation.html
Batch Update
ReactJS using the diff algorithm to find the minimum number of steps to update the Real DOM. Once it has these steps, it executes all the steps in one event loop without involving the steps to repaint the Real DOM. Thus, if there are more element which gets updated ReactJS will wait for the event loop to finish then, in bulk will update the real DOM with all the updated elements.
Once all the steps are executed, React will repaint the Real DOM. This means during the event loop, there is exactly one time when the Real DOM is being painted. Thus all the layout process will run only on time for updating the real DOM.
🔹Principles why React is so popular?
A.)Declarative”, at least in the programming sense, is usually defined as “telling what to do instead of how to do it”. When we talk about React being declarative, the most common explanation revolves around how when you write a component, you just tell React what do you want the DOM to look like, and just let React handle it from there. You don’t have to worry about how the different elements currently in the web page have to change, or which ones have to be removed or inserted. You just say “I want a button there, and I want it disabled”, and React makes it happen. “Now I want the button to be enabled”. No problem, React’s got your back.
B.)Concept of Reusable components.
C.)One way data Flow (if a state changes so it will get trickled down and tell everyone that hey state has changed.)
D.)I am just a UI.
🔹What is React reconciliation? How does it work?
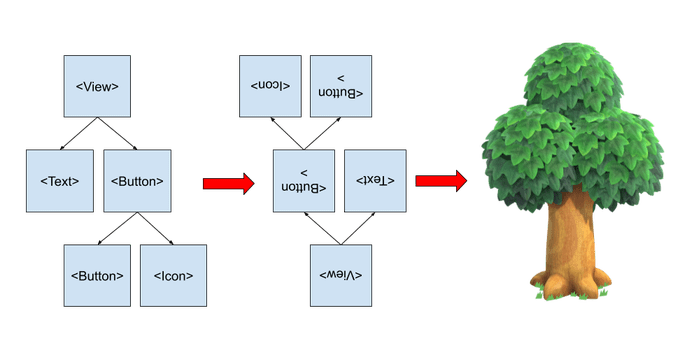
You might be familiar with a data structure called tree. Even if you are not, you work with it on a daily basis. A tree is a collection of nodes (components). Every node can have children that are themselves nodes. Basically, the JSX and HTML both can be described as trees.
The reconciliation algorithm, then, compares two trees and returns a set of operations to update the second tree so that it matches the first one. In the computer science world, this is called the Tree Distance Problem. Of course, it has a few general solutions, but their complexity is O(n³), which is completely inappropriate for user interfaces. In order to make it faster, the React team had to make some trade-offs.
Recall that the algorithm is optimized for user interfaces and the assumptions about user interfaces that we made earlier. These were the foundations of the reconciliation algorithm. Deriving from the assumptions, the algorithm takes these actions:
👉If a node has changed its type (H1 -> MARKUEE or View -> Text), the old one is dismissed and the new one is recursively rendered from scratch.
👉If two nodes in both trees have equal key props, they are the same node and are reused without creating a new one.
🔹React steps to find differences in both Virtual DOM?
For this please read https://medium.com/@gethylgeorge/how-virtual-dom-and-diffing-works-in-react-6fc805f9f84e
🔹Difference between class components and functional components.
The main differences between class components and functional components are as follows:
👉Syntax:
A functional component is just a plain JavaScript function which accepts props as an argument and returns a React element. A class component requires you to extend from React.Component and create a render function which returns a React element.
👉State:
Handling state in Functional Components
const FunctionalComponent = () => {
 const [count, setCount] = React.useState(0);

 return (
   <div>
     <p>count: {count}</p>
     <button onClick={() => setCount(count + 1)}>Click</button>
   </div>
 );
};
To use state variables in a functional component, we need to use useState Hook, which takes an argument of initial state. In this case we start with 0 clicks so the initial state of count will be 0.
👉Handling state in Class Components
class ClassComponent extends React.Component {
 constructor(props) {
   super(props);
   this.state = {
     count: 0
   };
 }

 render() {
   return (
     <div>
       <p>count: {this.state.count} times</p>
       <button onClick={() => this.setState({ count: this.state.count + 1 })}>
         Click
       </button>
     </div>
   );
 }
}
The idea is still the same but a class component handles state a bit differently. Firstly, we need to understand the importance of the React.Component constructor. Here is the definition from the official documentation:
“The constructor for a React component is called before it is mounted. When implementing the constructor for a React.Component subclass, you should call super(props) before any other statement. Otherwise, this.props will be undefined in the constructor, which can lead to bugs.”
Basically, without implementing the constructor and calling super(props), all the state variables that you are trying to use will be undefined. So let’s define the constructor first. Inside the constructor, you will make a state object with a state key and initial value. And inside JSX, we use this.state.count to access the value of the state key we defined in the constructor to display the count. Setter is pretty much the same, just different syntax.
👉Passing Props
Passing props can be confusing, but let’s see how they are written in both class and functional components. Let’s say we are passing props of the name “Riya” like below.
<Component name="Riya" />
const FunctionalComponent = ({ name }) => {
 return <h1>Hello, {name}</h1>;
};
Inside a functional component, we are passing props as an argument of the function. Note that we are using destructuring here. Alternatively, we can write it without as well.
const FunctionalComponent = (props) => {
 return <h1>Hello, {props.name}</h1>;
};
In this case, you have to use props.name instead of name.
class ClassComponent extends React.Component {
  render() {
    const { name } = this.props;
    return <h1>Hello, { name }</h1>;
 }
}
Since it is a class, you need to use this to refer to props. And of course, we can use destructuring to get name inside props while utilizing class-based components.
👉LifeCycle Methods
📍On Mounting (componentDidMount):
The lifecycle method componentDidMount is called right after the first render completes. There used to be a componentWillMount that happens before the first render, but it is considered legacy and not recommended to use in newer versions of React.
const FunctionalComponent = () => {
 React.useEffect(() => {
   console.log("Hello");
 }, []);
 return <h1>Hello, World</h1>;
};
Replacing componentDidMount, We use the useEffect hook with the second argument of []. The second argument of the useState hook is normally an array of a state(s) that changes, and useEffect will be only called on these selected changes. But when it’s an empty array like this example, it will be called once on mounting. This is a perfect replacement for a componentDidMount.
class ClassComponent extends React.Component {
 componentDidMount() {
   console.log("Hello");
 }

 render() {
   return <h1>Hello, World</h1>;
 }
}
Basically the same thing happens here: componentDidMount is a lifecycle method that is called once after the first render.
📍On Unmounting (componentWillUnmount)
const FunctionalComponent = () => {
 React.useEffect(() => {
   return () => {
     console.log("Bye");
   };
 }, []);
 return <h1>Bye, World</h1>;
};
We can also use a useState hook for unmounting as well. But be careful, the syntax is a bit different. What you need to do is return a function that runs on unmounting inside the useEffect function. This is especially useful when you have to clean up the subscriptions such as a clearInterval function, otherwise it can cause a severe memory leak on a bigger project. One advantage of using useEffect is that we can write functions for both mounting and unmounting in the same place.
class ClassComponent extends React.Component {
 componentWillUnmount() {
   console.log("Bye");
 }

 render() {
   return <h1>Bye, World</h1>;
 }
}
🔹Write a code for the button generic component? What are reusable components?
Read this https://buttercms.com/blog/building-reusable-components-using-react
From this link you will get an idea how to create button generic component.
🔹What is render prop pattern? Explain.
The term “render prop” refers to a simple technique for sharing code between React components using a prop whose value is a function.
👉Considering React-router library, holds the behavior of navigating to different pages. It renders the component when the path matches.
<Route path='/page' component={Page} />
const extraProps = { color: 'red' }
<Route path='/page' render={(props) => (
  <Page {...props} data={extraProps}/>
)}/>
As you can see in this example, takes in a function which renders the Page component.
👉This pattern is very useful when we want to share the same behavior among different components minimizing code repetitions.
👉Here are some example of libraries which use render props from Jared Palmer! Go poke around and have fun with them. https://github.com/jaredpalmer/awesome-react-render-props
🔹Explain Atomic Design Pattern.
👉Atomic design, developed by Brad Frost and Dave Olsen, is a methodology for crafting design systems with five fundamental building blocks, which, when combined, promote consistency, modularity, and scalability.
👉The five distinct levels of atomic design — atoms > molecules > organisms > templates > pages — map incredibly well to React’s component-based architecture.

📍Atoms: Basic building blocks of matter, such as a button, input or a form label. They’re not useful on their own.
📍Molecules: Grouping atoms together, such as combining a button, input and form label to build functionality.
📍Organisms: Combining molecules together to form organisms that make up a distinct section of an interface (i.e. navigation bar)
📍Templates: Consisting mostly of groups of organisms to form a page — where clients can see a final design in place.
📍Pages: An ecosystem that views different template renders. We can create multiple ecosystems into a single environment — the application.
Below are some great resources that I’ve found to be extremely insightful:
https://atomicdesign.bradfrost.com/chapter-2/
🔹What is JSX?
👉JSX stands for JavaScript XML. JSX allows us to write HTML in React. JSX makes it easier to write and add HTML in React.
👉JSX is not valid JavaScript. Web browsers can’t read it!
👉If a JavaScript file contains JSX code, then that file will have to be compiled. That means that before the file reaches a web browser, a JSX compiler will translate any JSX into regular JavaScript.
👉Example:The render() function in the HelloWorld component looks like it's returning HTML, but this is actually JSX. The JSX is translated to regular JavaScript at runtime. That component, after translation, looks like this:
class HelloWorld extends React.Component {
  render() {
    return (
      React.createElement(
        'h1',
        {className: 'large'},
        'Hello World'
      )
    );
  }
}
🔹What is the difference between state and props?
State - This is data maintained inside a component. It is local or owned by that specific component. The component itself will update the state using the setState function.
Props - Data passed in from a parent component. props are read-only in the child component that receives them. However, callback functions can also be passed, which can be executed inside the child to initiate an update.
The difference is all about which component owns the data. State is owned locally and updated by the component itself. Props are owned by a parent component and are read-only. Props can only be updated if a callback function is passed to the child to trigger an upstream change.
The state of a parent component can be passed a prop to the child. They are referencing the same value, but only the parent component can update it.
🔹What makes DOM manipulation slow?
The re-rendering or re-painting of the UI is what makes it slow. Therefore, the more UI components you have, the more expensive the DOM updates could be, since they would need to be re-rendered for every DOM update.
For further reading visit on : https://programmingwithmosh.com/react/react-virtual-dom-explained/
🔹What are synthetic events?
👉Synthetic events is a cross browser wrapper around browsers native event.It has same interface as browser native event.
👉It achieves consistency by normalizing events so that they have same properties across different browsers.
👉Example :When keydown happens plugin called changeEventPlugin which extracts onChange synthetic event. If five onClick event handlers so it will dispatch onClick synthetic event object one time. Synthetic event object dispatched is pooled means synthetic event object will be reused and all properties gets nullified after the event callback.
🔹What are pure components? Explain with example.
A React component is considered pure if it renders the same output for the same state and props. For class components like this, React provides the PureComponent base class. Class components that extend the React.PureComponent class are treated as pure components.
Pure components have some performance improvements and render optimizations since React implements the shouldComponentUpdate() method for them with a shallow comparison for props and state.
If you want React to treat a functional component as a pure component, you’ll have to convert the functional component to a class component that extends React.PureComponent.
Here’s a simple example:
// FUNCTIONAL COMPONENT
function PercentageStat({ label, score = 0, total = Math.max(1, score) }) {
  return (
    <div>
      <h6>{ label }</h6>
      <span>{ Math.round(score / total * 100) }%</span>
    </div>
  )
}


// CONVERTED TO PURE COMPONENT
class PercentageStat extends React.PureComponent {

  render() {
    const { label, score = 0, total = Math.max(1, score) } = this.props;

    return (
      <div>
        <h6>{ label }</h6>
        <span>{ Math.round(score / total * 100) }%</span>
      </div>
    )
  }

}
🔹Differences between controlled and uncontrolled components. Give example.
👉Controlled component: The value of input element is controlled by React. Takes value through props and notifies changes through callback like onChange.
Examples: form validation,disable submit button unless all fields have valid data,specific format needed like credit card format.
👉Uncontrolled Component Uncontrolled components act more like traditional HTML form elements. The data for each input element is stored in the DOM, not in the component. Instead of writing an event handler for all of your state updates, you use a ref to retrieve values from the DOM.
Example: manage focus.
For more understanding refer : https://itnext.io/controlled-vs-uncontrolled-components-in-react-5cd13b2075f9
🔹What is a higher-order component? Give example.
A HOC is structured like a higher-order function:
It is a component. It takes another component as an argument. Then, it returns a new component. The component it returns can render the original component that was passed to it.
import React from 'react';
// Take in a component as argument WrappedComponent
const higherOrderComponent = (WrappedComponent) => {
// And return another component
  class HOC extends React.Component {
    render() {
      return <WrappedComponent />;
    }
  }
  return HOC;
};
We can see that higherOrderComponent takes a component (WrappedComponent) and returns another component inside of it. With this technique, whenever we need to reuse a particular component’s logic for something, we can create a HOC out of that component and use it wherever we like.
For further explanation read https://dev.to/ogwurujohnson/introduction-to-higher-order-components-hocs-in-react-273f
🔹What is useState,useEffect?
👉useState is a hook that encapsulates local state management. Previously, functional components were called “stateless components,” but no longer! With useState, we can utilize what seems like local state for storing values. Actually, they’re more like “state variables” that React keeps track of by the order you declared them. useState saves us from having to create class-based components for state-related responsibilities, since it gives functional components the power and flexibility to handle it themselves.
Syntax: The first element is the initial state and the second one is a function that is used for updating the state.
const [state, setState] = useState(initialstate)
We can also pass a function as an argument if the initial state has to be computed. And the value returned by the function will be used as the initial state.
const [sum, setsum] = useState(function generateRandomInteger(){5+7);})
Importing: To use useState you need to import useState from react as shown below:
import React, { useState } from "react"
👉useEffect is a hook for encapsulating code that has ‘side effects,’ and is like a combination of componentDidMount, componentDidUpdate, and componentWillUnmount. Previously, functional components didn’t have access to the component life cycle, but with useEffect you can tap into it.
useEffect() hook accepts 2 arguments:
useEffect(callback[, dependencies]);
📍callback is the callback function containing side-effect logic. useEffect() executes the callback function after React has committed the changes to the screen.
📍dependencies is an optional array of dependencies. useEffect() executes callback only if the dependencies have changed between renderings.
🔹How to pass data from parent component to child components? And from child to parent components?
👉Passing data from parent to child :
When you need to pass data from a parent to child class component, you do this by using props.
For example, let’s say you have two class components, Parent and Child, and you want to pass a state in the parent to the child. You would do something like this:
import React from 'react';

class Parent extends React.Component{
    constructor(props){
        super(props);
        this.state = {
            data: 'Data from parent'
        }
    }

    render(){
        const {data} = this.state;
        return(
            <div>
                <Child dataParentToChild = {data}/>
            </div>
        )
    }
}

class Child extends React.Component{
    constructor(props){
        super(props);
        this.state = {
            data: this.props.dataParentToChild
        }
    }

    render(){
        const {data} = this.state;
        return(
            <div>
                {data}
            </div>
        )
    }
}

export default Parent;
As you can see, the parent component passes props to the child component and the child can then access the data from the parent via this.props. For the same example, if you have two function components instead of class components, you don’t even need to use props. You can do something like the following:
import React from 'react';

function Parent(){
    const data = 'Data from parent';
    return(
        <div>
            <Child dataParentToChild = {data}/>
        </div>
    )
}

function Child ({dataParentToChild}){
    return(
        <div>
            {dataParentToChild}
        </div>
    )
}

export default Parent;
👉Passing data from child to parent
Passing the data from the child to parent component is a bit trickier. In order to do this, you need to do the following steps:
📍Create a callback function in the parent component. This callback function will get the data from the child component.
📍Pass the callback function in the parent as a prop to the child component.
📍The child component calls the parent callback function using props.
Let’s see how these steps are implemented using an example. You have two class components, Parent and Child. The Child component has a form that can be submitted in order to send its data up to the Parent component. It would look something like this:
import React from 'react';

class Parent extends React.Component{
    constructor(props){
        super(props);
        this.state = {
            data: null
        }
    }

    handleCallback = (childData) =>{
        this.setState({data: childData})
    }

    render(){
        const {data} = this.state;
        return(
            <div>
                <Child parentCallback = {this.handleCallback}/>
                {data}
            </div>
        )
    }
}

class Child extends React.Component{

    onTrigger = (event) => {
        this.props.parentCallback("Data from child");
        event.preventDefault();
    }

    render(){
        return(
        <div>
            <form onSubmit = {this.onTrigger}>
                <input type = "submit" value = "Submit"/>
            </form>
        </div>
        )
    }
}

export default Parent;
As you can see, when the Child component is triggered, it will call the Parent component’s callback function with data it wants to pass to the parent. The Parent’s callback function will handle the data it received from the child.
🔹What is context API? or How can we avoid prop drilling?
When you’re passing data through props from top to bottom of the component tree, you probably experienced this frustration where you want to pass data from the top level component to a 3rd or 4th level level component but you end up passing these data to components on each level of the tree.
This is what we call Prop-drilling!
Prop Drilling Example:
We have a trivial example with 3 components (TodoPage, TodoList and TodoItem) to demonstrate prop-drilling.
We have a trivial example with 3 components (TodoPage, TodoList and TodoItem) to demonstrate prop-drilling.
📍 ToDo Page Component
class TodosPage extends React.Component {
  state = {
    todos: [
      { id: 1, desc: 'Check email', completed: false },
      { id: 2, desc: 'Write blog post', completed: false },
    ],
    user: { name: 'John', canDelete: true },
  };

  handleDelete = todo => {
    const todos = this.state.todos.filter(t => t.id !== todo.id);
    this.setState({ todos });
  };

  render() {
    const { todos, user } = this.state;
    return (
      <div>
        <TodoList
          todos={todos}
          onDelete={this.handleDelete}
          canDelete={user.canDelete}
        />
      </div>
    );
  }
}
📍 ToDo List Component
const TodoList = ({ todos, onDelete, canDelete }) => {
  return (
    <div>
      <Title value="Todo List" />
      <div>
        {todos.map(todo => (
          <TodoItem
            key={todo.id}
            todo={todo}
            onDelete={onDelete}
            canDelete={canDelete}
          />
        ))}
      </div>
    </div>
  );
};

TodoList.propTypes = {
  todos: PropTypes.array,
  onDelete: PropTypes.func,
  canDelete: PropTypes.bool,
};
📍ToDo Item Component
const TodoItem = ({ todo, onDelete, canDelete }) => {
  return (
    <div>
      <div>{todo.desc}</div>
      <div>
        <button disabled={!canDelete} onClick={() => onDelete(todo)} />
      </div>
    </div>
  );
};

TodoItem.propTypes = {
  todos: PropTypes.object,
  onDelete: PropTypes.func,
  canDelete: PropTypes.bool,
};
As you can see in the example, TodoItem needs onDelete and canDelete from the TodoPage but those values have to pass thru the TodoList even if this component doesn’t need them. And if you have a linter, you’ll probably have to define prop types on the TodoList for these props as well. Okay enough of that! Let’s now take a look at some solutions to this madness.
📍Solution — Context API
If you’re not familiar with the Context API, I encourage you to check it out first here. But in case you’re already familiar with it, let’s see how we can implement the example above using it.
// TodoPage.js
export const TodoContext = createContext({});

class TodoPage extends React.Component {
  state = {
    todos: [
      { id: 1, desc: 'Check email', completed: false },
      { id: 2, desc: 'Write blog post', completed: false },
    ],
    user: { name: 'John', canDelete: true },
  };

  handleDelete = todo => {
    const todos = this.state.todos.filter(t => t.id !== todo.id);
    this.setState({ todos });
  };

  render() {
    const { todos, user } = this.state;
    return (
      <TodoContext.Provider
        value={{ canDelete: user.canDelete, onDelete: this.handleDelete }}
      >
        <div>
          <TodoList todos={todos} />
        </div>
      </TodoContext.Provider>
    );
  }
}


// TodoList.js
const TodoList = ({ todos }) => {
  return (
    <div>
      <Title value="Todo List" />
      <div>
        {todos.map(todo => (
          <TodoItem key={todo.id} todo={todo} />
        ))}
      </div>
    </div>
  );
};

TodoList.propTypes = {
  todos: PropTypes.array,
};


// TodoItem.js
const TodoItem = ({ todo }) => {
  return (
    <TodoContext.Consumer>
      {({ onDelete, canDelete }) => (
        <div>
          <div>{todo.desc}</div>
          <div>
            <button disabled={!canDelete} onClick={() => onDelete(todo)} />
          </div>
        </div>
      )}
    </TodoContext.Consumer>
  );
};

TodoItem.propTypes = {
  todo: PropTypes.object,
};
Okay so, in the code above we were able to avoid passing onDelete and canDelete to the TodoList. Using the Context API we can directly pass data from the TodoPage to the TodoItem or to any leaf component in the component tree.
Context API is a great way to avoid prop-drilling but it isn’t a simple solution. It requires you to do some extra work to take advantage of it. Another caveat is that it tightly couples your component with a context, which means it will be a bit difficult to facilitate reuse.
🔹What do you mean by ~ or ^ in react package.json?
Example : the react version is specified as ^16.6.3, which means that npm will install the most recent major version matching 16.x.x. In contrast if you see something like ~5.6.7 in package.json, it means that it will install the most recent minor version matching 5.6.x.
🔹What are service workers?
👉Service workers are scripts that are run by the browser. They do not have any direct relationship with the DOM. They provide many out of the box network-related features. Service workers are the foundation of building an offline experience. They enable features such as push notifications and background sync.
👉Service Workers: Use Cases
The loss of network is a common issue that developers face in ensuring a seamless connection. Thus, in recent times, the concept of offline applications to ensure superior user experience is gaining popularity. Service workers provide web developers with a lot of benefits:
📍They improve the performance of your website. Caching key parts of your website only helps in making it load faster.
📍Enhances user experience through an offline-first outlook. Even if one loses connectivity, one can continue to use the application normally.
📍They enable notification and push APIs, which are not available through traditional web technologies.
📍They enable you to perform background sync. You can defer certain actions until network connectivity is restored to ensure a seamless experience to the user.
🔹Create a simple to-do list app with a single button, add functionality and delete functionality to be implemented?
For this please refer: https://www.educative.io/blog/react-hooks-tutorial-todo-list
🔹Implement a Home Loan calculator using React Hooks?
For this refer :(step by step explanation) https://dev.to/suzanamelomoraes/building-a-loan-calculator-using-react-hooks-141o
🔹What is React router?
React Router is the standard routing library for React. From the docs: “React Router keeps your UI in sync with the URL. It has a simple API with powerful features like lazy code loading, dynamic route matching, and location transition handling built right in.
https://yogeshchavan1.podia.com/react-router-introduction
🔹How to prevent re-renders on React functional components?
To optimize, and prevent multiple React renders, I’m going to use another React tool called React.memo().
In programming, memoization is an optimization technique. It’s primarily used to speed up computing by story the result of a function and returning the cached result, when the same inputs occur again.
🔹What is memo used for?
React.memo() is similar to PureComponent in that it will help us control when our components rerender.
Components will only rerender if its props have changed! Normally all of our React components in our tree will go through a render when changes are made. With PureComponent and React.memo(), we can have only some components render.
🔹Difference between state and ref.
useState would be used in the cases when we want to maintain and update the properties during the re-rendering of view.useRef we will use if we want to persist the values throughout the lifetime of the component.
For further explanation : https://simbathesailor.dev/useismounted-ref-vs-state-approach%20/
🔹What is a reducer?
a reducer is a function which takes two arguments -- the current state and an action -- and returns based on both arguments a new state. In a pseudo function it could be expressed as:
(state, action) => newState
https://www.robinwieruch.de/javascript-reducer
🔹Implement Bulb Component to switch on/off
https://dmitripavlutin.com/react-usestate-hook-guide/
🔹Explain Lifecycle methods.
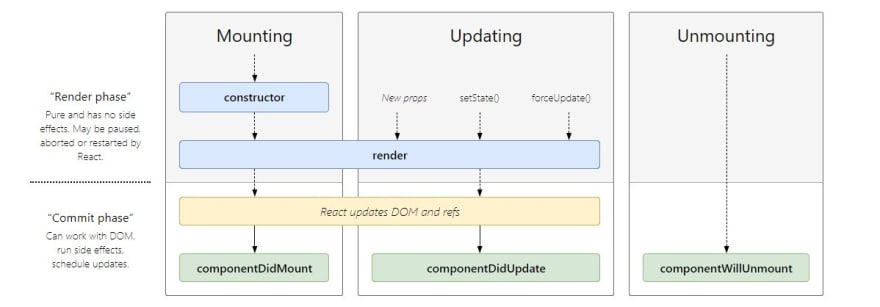
Mounting In the process of mounting a component, a component goes through four lifecycles methods in the following order: a. constructor() b. getDerivedStateFromProps() c. render() d. componentDidMount()
Updating
In the case where props or state of a component changes, a component goes through 5 stages in the following order: a. getDerivedStateFromProps() b. shouldComponentUpdate() c. render() d. getSnapshotBeforeUpdate e. componentDidUpdate()
- Unmounting A component has only one lifecycle method in the unmounting stage. a. componentWillUnmount()
Lifecycle Methods Explained
📍constructor(props): This method is called when the component is first initialized. ( This is where you can set initial state values and bind class methods)
📍render(): This method is a lifecycle method that returns elements as an output of the component. This method must always be treated as a pure function(Meaning it must not modify the component state). It takes input as props and state and returns a new/modified element.
📍componentDidMount() is called when the component gets mounted. Here, you can perform async requests to fetch data from an API server.
📍shouldComponentUpdate(nextProps, nextState): This method gets called everytime a component updates due to state or prop changes. The component and all it's children will render or not depending on what is returned from this method.
📍getSnapshotBeforeUpdate(prevProps, prevState): In certain cases, the component needs to get information from the DOM before it is potentially changed. This method allows us to do that.
📍componentDidUpdate(prevProps, prevState, snapshot): This a lifecycle method that is invoked immediately after updating, but not for the initial render. You can use it as to perform DOM operations or to perform more asynchronous requests. If your component implements the getSnapshotBeforeUpdate() method, the value it returns will be received as the snapshot parameter.
📍componentWillUnmount() is called before you destroy your component. You can use this lifecycle method to perform any cleanup tasks.
🔹What is side effect cleanup in React?
Some side-effects need cleanup: close a socket, clear timers.
If the callback of useEffect(callback) returns a function, then useEffect() considers this as an effect cleanup:
useEffect(() => {
  // Side-effect...

  return function cleanup() {
    // Side-effect cleanup...
  };
}, dependencies);
Cleanup works the following way:
A) After initial rendering, useEffect() invokes the callback having the side-effect. cleanup function is not invoked.
B) On later renderings, before invoking the next side-effect callback, useEffect() invokes the cleanup function from the previous side-effect execution (to clean up everything after the previous side-effect), then runs the current side-effect.
C) Finally, after unmounting the component, useEffect() invokes the cleanup function from the latest side-effect.
Let’s see an example when the side-effect cleanup is useful.
The following component accepts a prop message. Then, every 2 seconds the message prop is logged to console:
import { useEffect } from 'react';

function RepeatMessage({ message }) {
  useEffect(() => {
    setInterval(() => {
      console.log(message);
    }, 2000);
  }, [message]);

  return <div>I'm logging to console "{message}"</div>;
}
The console logs every 2 seconds any message that’s been ever typed into the input. However, you need to log only the latest message.
That’s the case to clean up the side-effect: cancel the previous timer when starting a new one. Let’s return a cleanup function that stops the previous timer:
import { useEffect } from 'react';

function RepeatMessage({ message }) {
  useEffect(() => {
    const id = setInterval(() => {
      console.log(message);
    }, 2000);
    return () => {
      clearInterval(id);
    };
  }, [message]);

  return <div>I'm logging to console "{message}"</div>;
}
🔹Case of infinity loop in useEffect.
https://dmitripavlutin.com/react-useeffect-infinite-loop/#:~:text=A%20common%20case%20that%20generates,%3D%3E%20%7B%20%2F%2F%20Infinite%20loop!
🔹What are the use-cases of use effect hook?
https://linguinecode.com/post/getting-started-with-react-useeffect
🔹What are React Event Handlers?
First, we will start with a button example in React for a specific onClick event handler. It's the most basic example on how to handle events in React with an event handler (also called event handler function or handler). A button has a onClick attribute which receives a function. This function is called every time the event is triggered (here: when clicking the button):
import React from 'react';

function App() {
  const [count, setCount] = React.useState(0);

  function handleClick() {
    setCount(count + 1);
  }

  return (
    <div>
      Count: {count}

      <button type="button" onClick={handleClick}>
        Increase Count
      </button>
    </div>
  );
}
👉there are callback event handlers or callback handlers in short. They are used when a child component needs to communicate to a parent component. Since React props are only passed down the component tree, a callback handler, which is a function at its core, is used to communicate upward:
function App() {
  const [text, setText] = React.useState('');

  // 1
  function handleTextChange(event) {
    setText(event.target.value); // 3
  }

  return (
    <div>
      <MyInput inputValue={text} onInputChange={handleTextChange} />

      {text}
    </div>
  );
}

// 2
function MyInput({ inputValue, onInputChange }) {
  return (
    <input type="text" value={inputValue} onChange={onInputChange} />
  );
}
A callback handler is defined somewhere (1), used somewhere else (2), but calls back to the place where its defined (3). This way, it's possible to communicate from child to parent components. A callback handler is passed down via React props and communicates up when the function is called.
🔹What are error boundaries in ReactJs?
Error boundaries were introduced in React 16 as a way to catch and handle JavaScript errors that occur in the UI parts of our component. So error boundaries only catch errors that occur in a lifecycle method, render method, and inside Hooks like useEffect. According to the React documentation, error boundaries do not handle errors in:
📍Event handlers
📍Asynchronous code (e.g., setTimeout or requestAnimationFrame callbacks)
📍Server-side rendering
📍Errors thrown in the error boundary itself (rather than its children)
So basically, error boundaries only handle errors in the parts of our code that involve React.
To create an error boundary, we simply have to create a class component and define a state variable for determining whether the error boundary has caught an error. Our class component should also have at least three methods:
📍A static method called getDerivedStateFromError, which is used to update the error boundary’s state
📍A componentDidCatch lifecycle method for performing operations when our error boundaries catch an error, such as logging to an error logging service.
📍A render method for rendering our error boundary’s child or the fallback UI in case of an error.
🔹How do you style React Components?
There are various strategies to follow when planning to style React components, these strategies have also increased and evolved over the years. In this tutorial, we would be talking about the most popular and modern styling strategies, and how to use them to style our React components. These styling strategies include:
📍CSS and SCSS Stylesheets(https://www.smashingmagazine.com/2020/05/styling-components-react/#css-and-stylesheets) This involves using separate stylesheets like our conventional way of styling our HTML websites either with CSS or a CSS preprocessor called SASS.
📍CSS Modules(https://www.smashingmagazine.com/2020/05/styling-components-react/#css-modules) A CSS Module is a CSS file in which all class names and animation names are scoped locally by default.
📍styled-component(https://www.smashingmagazine.com/2020/05/styling-components-react/#styled-components) styled-components is a library for React and React Native that allows you to use component-level styles in your application that are written with a mixture of JavaScript and CSS using a technique called CSS-in-JS.
📍JSS(https://www.smashingmagazine.com/2020/05/styling-components-react/#jss) JSS is an authoring tool for CSS which allows you to use JavaScript to describe styles in a declarative, conflict-free and reusable way. It can compile in the browser, server-side or at build time in Node.
🔹How to handle asynchronous calls?
Read :https://css-tricks.com/fetching-data-in-react-using-react-async/
🔹Implement 404 Page not found.

A 404 page is what a user sees when they try to reach a non-existent page on your site (because they’ve clicked on a broken link, the page has been deleted, or they’ve mistyped a URL).
You have two options to show page not found component:
-Redirect to yoursite.com/404 -Show Page not found content with requested URL
In Order to redirect you need to import Redirect from “react-router-dom”. Place the redirect code at the very last path of your routes.
import React from "react";
import { Redirect, Route, Switch, BrowserRouter } from 'react-router-dom';
import HomePage from './pages/HomePage.jsx';
import NotFoundPage from './NotFoundPage.jsx';
class App extends React.Component {
    render(){
        return(
            <BrowserRouter>
                <Switch>
                    <Route exact path='/' component={HomePage} />
                    <Route path="/404" component={NotFoundPage} />
                    <Redirect to="/404" />
                </Switch>
            </BrowserRouter>
        )
    }
}

export default App;
If you need any kind of help you can ping me on https://www.linkedin.com/in/riya-jain-6691b8127/ and I will be happy to share my knowledge with you all.
Happy Learning😊


